Deploying a Go web API on Kubernetes, part 2: The Kubernetes part
 Iede Snoek
Introduction
In the first part of this two-part series we built a small web api, backed by a postgres database. Now the time has come to deploy this to a kubernetes cluster.
For the prerequisites needed to follow along I refer to the first part of this series. The code for this project can be found on Github.
Building the Docker image
In order for us to deploy the web app in a kubernetes cluster, we need to turn it into a Docker image. So, we need a Dockerfile, which looks like this (this file is in the main directory of the project you created in the first part):
FROM golang:1.20-alpine as builder
WORKDIR /app
COPY go.* .
RUN go mod download
COPY . .
RUN go build -o eventsweb main.go

FROM alpine:latest
RUN apk --no-cache add ca-certificates libc6-compat
WORKDIR /app
COPY --from=builder /app/eventsweb .
EXPOSE 8080
CMD ["./eventsweb"]
Some explanation might be needed here:
- The image is built in two steps.
- The first step is the builder image, which is used to build the executable. One of the advantages of Go (and also Rust of course) is that you have just one executable.
- The second image is based on a small alpine image, which is prepared by running the apk command and copying the executable from the builder image.
- Port 8080 is exposed, and the executable gets executed.
Why the two steps? Well, we found out that when you do not do this you end up with an image of over 800 MB which is typically too big
Now we can build the image, type in your terminal:
docker build -t <your dockerhub username>/webevents:v1 .
This can take a while depending on your internet speed.
After this enter the following commands:
docker login
docker push <your dockerhubusername>/webevents:v1
Now we can start on the kubernetes parts
The Configuration Map
Because both the postgres container and the web app container share some information, like the database information, it is handy to deploy a Configuration Map, to store these values. Create a directory called in the main directory, and in that directory add a file called db-configmap.yaml:
apiVersion: v1
kind: ConfigMap
metadata:

  name: db-secret-credentials
  labels:
    app: postgresdb
data:

  POSTGRES_DB: "webevents"

  POSTGRES_USER: "eventadmin"

  POSTGRES_PASSWORD: "secret1234#"
  HOST: "postgresdb.default"
  PORT: "5432"
It might be better to use secrets, but for simplicity we use a config map here.
Before applying this map, make sure your cluster is running. If you are using minikube, type:
minikube status
If it is not running, type:
minikube startIf everything is running ok, type:
cd kubernetes
kubectl apply -f db-configmap.yaml
That is all there is to it.
The Persistent Volume
The database needs some storage space, so we will start with a a persistent volume. Create a file name db-persistent-volume.yaml in the kubernetes directory:
apiVersion: v1

kind: PersistentVolume
metadata:

  name: postgresdb-pv

  labels:
    type: local
    app: postgresdb
spec:
  storageClassName: manual
  capacity:

    storage: 8Gi

  accessModes:
    - ReadWriteMany

  hostPath:
    path: "/data/db"
We use a hostPath since again this the simplest way to add a volume. If you are deploying to for instance Azure or AWS, you could choose different storage options. The size is set to 8Gb, which is arbitrary.
Apply this file:
kubectl apply -f db-persistent-volume.yaml
The Persistent Volume Claim
In order to acces the volume, we need a claim. Create a ‘db-volume-claim.yaml’ in the kubernetes directory:
apiVersion: v1

kind: PersistentVolumeClaim
metadata:

  name: db-persistent-pvc
spec:
  storageClassName: manual
  accessModes:
    - ReadWriteMany

  resources:
    requests:
      # the PVC storage
      storage: 8Gi
This claim requests a persistent with accessMode ReadWriteMany and of 8Gb or more.
Apply this:
kubectl apply -f db-volume-claim.yaml
The database deployment
This is the biggest yaml file. In the kubernetes directory add a file ‘db-deployment.yaml’:
apiVersion: apps/v1
kind: Deployment
metadata:
  name: postgresdb
spec:
  replicas: 1
  selector:
    matchLabels:
      app: postgresdb
  template:
    metadata:
      labels:
        app: postgresdb
    spec:
      containers:
        - name: postgresdb
          image: postgres
          ports:
            - containerPort: 5432
          envFrom:
            - configMapRef:
                name: db-secret-credentials
          volumeMounts:
            - mountPath: /var/lib/postgres/data
              name: db-data
      volumes:
        - name: db-data
          persistentVolumeClaim:
            claimName: db-persistent-pvc
A few notable points:
- We use the latest postgres image.
- We assign the standard postgres port 5432
- The mountPath in the volumeMounts is the path within the container, the name db-data refers to the claim which refers to a local directory (because of hostPath)
Now we can apply this file:
kubectl apply -f db-deployment.yaml
The Database service
In order to access the database we need a so-called service. Create a ‘db-service.yaml’ in the kubernetes directory:
apiVersion: v1
kind: Service
metadata:
  name: postgresdb
  labels:
    app: postgresdb
spec:
  ports:
    - port: 5432
  selector:
    app: postgresdb
A few remarks:
- We specify port 5432 as the standard port for connecting to Postgres.
- The label ‘app:postgresdb’ is used to connect the service to the correct pod
The Web API deployment
The web api deployment looks a bit less complicated than the Postgres deployment. Create a web-deployment.yaml file in your kubernetes directory:
apiVersion: apps/v1
kind: Deployment
metadata:
  name: web-deployment
spec:
  replicas: 1
  selector:
    matchLabels:
      app: web
  template:
    metadata:
      labels:
        app: web
    spec:
      containers:
        - name: web
          image: <your dockerhub username>/webevents:v1
          imagePullPolicy: IfNotPresent

          env:
            - name: "host"
              valueFrom:
                configMapKeyRef:
                  key: HOST
                  name: db-secret-credentials
            - name: "user"
              valueFrom:
                configMapKeyRef:
                  key: POSTGRES_USER
                  name: db-secret-credentials
            - name: "password"
              valueFrom:
                configMapKeyRef:
                  key: POSTGRES_PASSWORD
                  name: db-secret-credentials
            - name: "dbname"
              valueFrom:
                configMapKeyRef:
                  key: POSTGRES_DB
                  name: db-secret-credentials
            - name: "port"
              valueFrom:
                configMapKeyRef:
                  key: PORT
                  name: db-secret-credentials
Again a few remarks:
- We get the environment variables from the same configmap as the database deployment, the map is named db-secret-credentials
- The label ‘app: web’ is used later on to connect a service to this deployment.
Now we can deploy it:
kubectl apply -f web-deployment.yaml
The Web service
We want this web API to be publicly available. There we need a service definition. Create a web-service.yaml file in your kubernetes directory:
apiVersion: v1
kind: Service
metadata:
  name: web-service
spec:
  selector:
    app: web
  ports:
    - protocol: TCP
      port: 80
      targetPort: 8080
  type: LoadBalancer
Again, some explanation is needed:
- The service is named web-service.
- The label ‘app:web’ is used to connect the service to the correct pod(s)
- Since we want to open port 80 to the outside, but the pod itself is listening on port 8080, we set the port to 80 and the targetPort to 8080
- Also, because this service should be accessible from the outside, the type is LoadBalancer, an excellent explanation of this can be found here.
Apply this:
kubectl apply -f web-service.yamlThat’s it, now we can start testing
Testing the setup with minikube
Once you have deployed all of these yaml files, you can open a new terminal and type:
minikube service web-service
And you will see something like this:
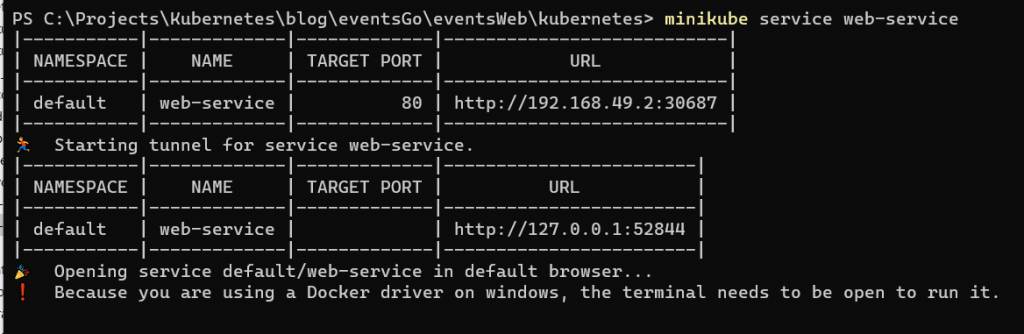
Now open Postman and test the URL (make sure you get the right portnumber, in my case this is 52844, but this can be different):

Make sure again that you have the right URL, method. Set the Body to raw and JSON. As you can see, an Id is automatically assigned.
Now to retrieve it:
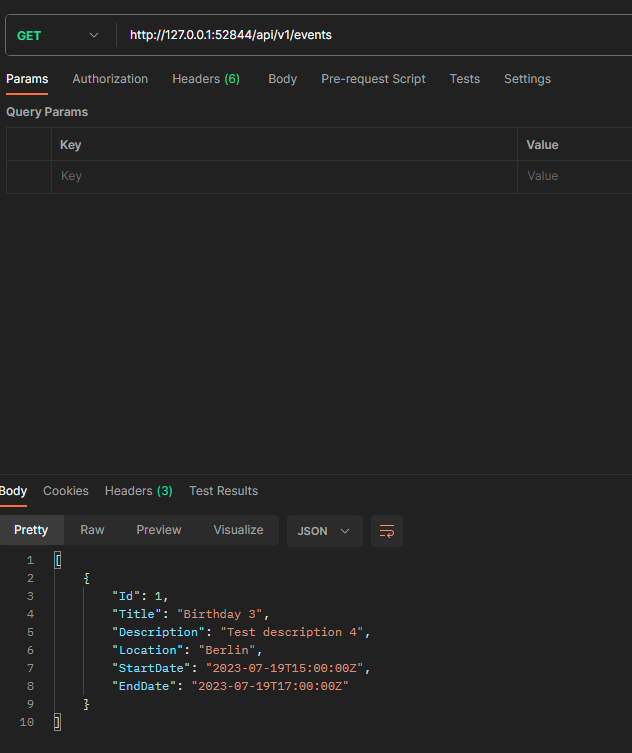
It works!
Conclusion
As you can see, deploying a setup like this is quite straightforward, although it took me the better part of a week to figure everything out, but that is mainly due to my relative inexperience with Kubernetes.
Once everything is up and running it is very smooth. Some improvements on this setup might be:
- The use of real secrets and secret encryption instead of having everything in plain text. That is something for another article.
- Experimenting with scaling. Since both Postgres and the Web API are on different pods they can be independently scaled.
- Putting Postgres and the Web API on different nodes, maybe on different machines.
- Deploying this setup to for example an Azure Kubernetes Service or another cloud provider.
Those are all ideas for my next articles. In the meantime, I hope you enjoy this one.